Sunday, February 28, 2016

Joustcar Final Report Blog

A) Todd Obilor, John Czubak, Drew Collishaw
Period 4
Physics
Mr. Yav
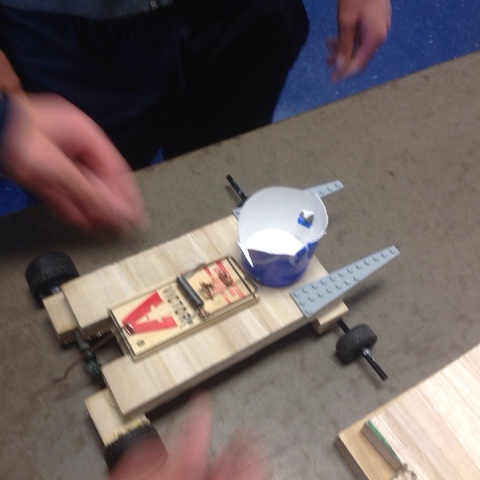
Vehicle name: Another Win

B) Table of Contents:
-Introduction
-Construction Procedure 
-Operation of Mousetrap Car
-Results
-Conclusion/Improvements
-Appendix

C) The purpose of this project was to use a mousetrap and other materials to build a "car" that would demonstrate the conservation of energy as it's transferred from elastic PE to KE. We will also demonstrate the conservation of momentum through the aftermath of collisions. We must use other materials to protect an egg that will be placed on the car. Our goal is to use a mousetrap to power the car and move it towards a downward ramp that will be opposite of another car. The cars will collide and our goal is to break the opponents egg and keep ours safe. Our preliminary ideas included using lego tires in order to increase the traction, using a pencil in order to increase leverage, and using lego pieces as axels in order to increase durability. We also planned to keep the car light by not adding any extra materials.


F) A mousetrap car harnesses the spring potential energy of a mousetrap. When the handle of the mousetrap is pulled back, a large amount of potential energy is at play as the spring is being contained. When the handle is released, that potential energy is turned into kinetic energy. More specifically, when the handle is released it whips back into its original position, pulling the string with it, which in turn pulls the axel of the back wheels. This causes the wheels to turn, moving the car. For a short spurt of energy the length of the handle on the mousetrap will do fine, but for less velocity covering a greater distance, a longer rod will need to be attached to the handle to increase the tension in the string, making it harder for the spring to overcome and thus increasing the time it take to finish.


G) Our car outperformed any of our expectations because it wasn't even working just minutes before we had to joust. Our car didn't even make it down the ramp for our first round so we had to make adjustments and fight our way through the losers bracket to make it to the championship. We ended up losing in the championship round because the opposing car caused our egg to fly out and break. For the time trial, our time for 1.5 meters was 1.74 seconds. Using this information we can find the acceleration: a=d/t; a=1.5m/1.74 sec which leads to the acceleration being equal to .86 m/s^2.  


H) In a way, we were incredibly lucky because our car's light structure made it prone to being impaled easily by opposing cars, but it also allowed for more speed. In another lucky turn of events, our car made it to the end of the runway but would often fall apart when it got to the end causing us to reassemble it. Through all these misfortunes, we learned that there were many improvements that we could have made ahead of time in order to avoid last minute car breakdowns that caused us much stress. First, our car's misbalanced structure caused us to have to add more mousetraps at the last minute to balance the car. We could have avoided this by testing out the car ahead of time and adding different weights onto the car that weren't bulky. We also used too much fishing line to spin the axel, unfortunately this would lead to our loss in competition because our car eventually got caught on the line and did not move. They were definitely things that we would keep if we did it again like the fact that we decided not to use a pencil to increase the motion of the vehicle. Also, we would keep the light design of the vehicle and the lego tires and axel.


I)


Friday, January 29, 2016

Preliminary Report for Egg Joust

Title Section: The title of the design project is to be in the center of the page. Include the following items:
 a) Date: January 29, 2016 
 b) Course/Section: Physics 
 c) Instructor: Mr. Yav 
 d) Team Members: Drew Collishaw, Todd Obilor, John Csubak 
 2. Executive Summary (A few sentences with a diagram, sketch, or picture): 
 a) The purpose of the executive summary is to provide key information up-front, such that while reading the report, a reader has expectations that are fulfilled on a continuous basis. Key to a good Summary is the first sentence, which must contain the most essential information that you wish to convey. 
 b) It must include a short description of the project, requirements, and your intended goal.
 c) The summary is to be written as if the reader is totally uninformed about your project and is not necessarily going to read the report itself. The purpose of this project is to use a mousetrap and other materials to build a "car" that will demonstrate the conservation of energy as it's transferred from elastic PE to KE. We will also demonstrate the conservation of momentum through the aftermath of collisions. We must use other materials to protect an egg that will be placed on the car. Our goal is to use a mousetrap to power the car and move it towards a downward ramp that will be opposite of another car. The cars will collide and our goal is to break the opponents egg and keep ours safe.
 3. Table of Contents Section: Include section titles I
. Design problem and objectives 
II. Detailed design documentation 
III. Test plans 
IV. Bill of materials
 V. Task chart 
VI. Safety and Ethical Consideration 
VII. References 
 4. Design problem and objectives (elaborate from your executive summary, 1/2 to a 3⁄4 page): Give a clear and concise definition of the problem and the intended objectives. Outline any design constraints (you can find some of this info in the design description). a) Include appropriate background on the project for the reader to be able to put the information provided in context. You are elaborating more on the executive summary. The problem we have faced is the only form of energy we can use is a mousetrap, so we must make our car relatively light since it will go faster the lighter it is. Also, the mousetrap isn't very big so we need to figure out a way to increase the amount of energy it will produce by tying a string to a stick to make it longer, increasing the PE and KE. Since maximum potential energy is equal to maximum kinetic energy, if we increase the potential energy, we will also increase the amount of kinetic energy that is present at its fastest point. We also need to figure out the problem with friction from the tires. It can't be zero friction because the immediate increase in energy would not allow the car to reach its full velocity, however it cannot be to much friction because that will result in the car being to "sticky" and not going as fast as it could. This is why we plan to use Lego tires that have a rubber coating but do not cause the car to lose energy. Furthermore, we need to get the size of the tires right because it needs to accelerate quickly, which is why we plan on using wheels with a 3"-4" diameter to maximize the acceleration. If the mousetrap contraption ends up working, our car should be a very solid design and reach our goal of making it 1.5 meters.
5. Detailed design documentation: Show all elements of your design (*7 pts)
First, as necessary, we will be constructing our entire car around the standard mousetrap. For the supporting framework, we will be using legos supplied by one of our group members. The first of these supporting frameworks is the axle which will have fishing wire wound around it and tied to the lever of the mousetrap. The mousetrap's lever is potential (stored) energy, and the levers movement directly affects the string causing the axle to spin and the car to move. Specifically, when the lever activates, work is being done on it because the force of the lever coming down causes a displacement to the car. The standard mousetrap will have a wooden pencil secured to it in order to increase the displacement of the lever and increase the work. When the axle spins, the wheels will obviously begin to move, and the wheel specifications also play a vital role in the movement of the car. The wheels we plan to use would be 1-2 inches in diameter in order to allow it to accelerate quickly yet still be mobile. This is because acceleration is velocity over time and the less time it takes for the wheels to move in rapid revolutions, the faster the acceleration. Also, in an effort to make the wheels mobile, we will use wheels that have rubber tread on them to increase friction. The rubber helps because it increases the coefficient of friction (stickiness) of the tires. As I stated earlier, the mousetrap will remain in the base of our car; however, we plan to use legos in the outer layer of our car. Although this protects against the crumpling or demolition of the car body we needed to take precaution to protect the driver. Therefore, we were inspired by airbags in cars, to build a compartment out of legos that would act as the "driver's seat" and use cotton balls as a cushion for the egg. The reason why cotton balls would be safe are because their plushness increases the time of a collision and therefore minimizing the amount of force in the collision. In order to impale the other car, we had to take precautions to both hurt it yet follow the rules AND protect ourselves. Therefore, we decided to use a plastic fork which could do significant damage to another driver if it had enough momentum. Thus, we used the formula that momentum is mass times velocity to know that adding more legos and traveling at a good speed would impale the car. We will keep that in mind while building. 
b) Cost analysis
Cotton Balls- $3.00
Legos- free (have already)
Wooden pencil- free (have already)
Wheels- free (have already)
Mousetrap- $10.00
Plastic Forks- $5.00
c) Any human factors considered
The biggest human factor has to be experimenting with the placement of all the objects on the car and making sure they fit in a way that does not impede the car.
d, e) Include pictures diagrams from any white board brainstorming sessions.

6. Test plans for all portions of the system that you built and tested. Write a narrative description of test plan(s). How to plan to test your design and what results would you expect? Provide 2-3 possible scenarios for each part.
We plan to test out the car by making a ramp out of makeshift materials found around the house. We first would put the car on the ramp BEFORE we begin to add on framework to make sure that all the attachments between the axle and the lever worked as planned. Once they did we would test with the framework, followed by the egg compartment, then with the weaponry. I expect to first see that the axel will not hookup correctly and that the wheels will stay locked causing the car to not move. Also, I expect to see major and constant revisions with the driver's compartment with the impulse that the egg would have to experience.
7. Bill of materials: Start piecing this list together early. Your initial set of parts may not reflect your list in your final report. Include approximate costs.
Cotton Balls- $3.00
Legos- free (have already)
Wooden pencil- free (have already)
Wheels- free (have already)
Mousetrap- $10.00
Plastic Forks- $5.00
8. Task chart: Show a complete listing of the major tasks to be performed for all different parts of the project, a time schedule for completing them, and which team member has the primary responsibility (and who will be held accountable) for each task.

John: bring materials, help with design
Todd: manufacturing/construction
Drew: testing/ modifications

9. Safety and Ethical Consideration: Provide information on any ethical considerations that govern the product specifications you have developed or that need to be taken into account in potentially marketing the product. Also provide a statement of the safety consideration in your proposed design to the extent that is relevant.

Be careful not to stick finger in rat trap. Very safe and reliable product. 

10. References: Including websites, books, technical journals, patents.

No external resources accessed

Tuesday, December 8, 2015

Physics in Real Life


1) Category: Natural
Title: Dribble Dribble
Physics Concept: Action/Reaction
Description of Photo: In this photo, my brother is dribbling a basketball similar to how one would do so when he or she is playing basketball. When my brother dribbles the ball, he hits the ball towards the ground repeatedly as a way of moving the ball.
Explanation of Physics: Since the ball is made of rubber, if he bounces the ball on the ground with a strong force, the ball will come up with a strong force as well. There are many ways for a player to control his or her dribbling to make sure that the ball does not move too far out of reach. First, he or she can bounce the ball at a force that keeps the ball at waist height. This ideology corresponds well with Newton's third law of an action with an equal and opposite reaction. My brother exerts an applied force on the ball. In contrast, when the ball hits the ground, the normal force of the ground exerts itself on the ball. This action and subsequent reaction, causes the ball to bounce.


2) Category: Contrived
Title: Parachuting His Way to Victory
Physics Concept: Freefall/Projectile Motion
Description of Photo: In this photo, I tied a small parachute that I found in my house and tied it to one of my old action figures. I did this in order to show the effects of freefall motion since I could not go skydiving.
Explanation of Physics: The physics in this photo is almost synonymous with the subjects of freefall and projectile motion. In freefall, an object falls to the earth with an acceleration of -9.8 m/s^2. Since the action figure has a parachute attached to it, it reaches the earth much slower than if it had no parachute. However, one can still learn the effects that a parachute has on the rate at which an object falls to the earth. In addition, this photo can shed light on the subject of projectile motion. A projectile is an object thrown into space by the exertion of force. Due to the fact that the action figure was dropped, it is indeed a projectile. 

3) Category: Contrived
Title: No Lift, Just Drag
Physics Concept: Friction
Description of the Photo: In this photo, my brother attempts to drag this chair across the room. He knows that it is heavy, so he has to figure out some mechanism to do it effectively.
Explanation of Physics: When my brother drags the chair across the floor, he knows that he wants as little friction as possible to make the drag easy. In other words, he wants a low friction coefficient so that he does not have to exert a lot of force on the chair. He is already at a disadvantage because the carpet has a higher friction coefficient than the carpet. Therefore in order to decrease the friction, he tilts the chair so that only two of the legs touch the floor instead of four. Also, it is very hard to first start moving the chair due to the high static friction which comes with making the chair move. After, the kinetic friction will be much less than the static friction allowing easy movement. In order for the chair to move, my brother must exert a stronger applied force to move the chair to overcome the kinetic friction. 

4) Category: Contrived
Title: Flying High, The Limit is The Sky
Physics Concept: Center of Mass
Description of Photo: In this photo, my friend Darius is attempting to jump over a bar in high jump that is 6 feet 11 inches in the air. He was successful!
Explanation of Physics: I, a fellow high jumper, know that there is a significant amount of physics involved in the high jump most of all. First, for Darius to get up that high he has to take off the ground with a significant amount of force. He also has to twist his body from moving sideways to moving vertically. Also, for most humans, their center of mass is located near their navel region. In Darius' exquisite high jump form, he makes sure to rotate his hips upward so that his center of mass is technically under the bar allowing the rest of his body to clear the bar afterwards. 

5) Category: Natural
Title: Technique of the Shot
Physics Concept: Force/ Kinetic Energy
Description of Photo: In this photo, my brother attempts a basketball shot. He follows the elements of a good shot perfectly.
Explanation of Physics: The shot in basketball is stuffed with physics that contribute to the ball going into the net. In this photo in particular, my brother needs to jump into the air in order to give him a better trajectory. So he exerts force on the ground to launch himself in the air. Next, when he is shooting, he needs the force in his arms to propel the ball towards the basket. Therefore, he winds his elbow back (which is his potential energy) so that when his elbow extends, its kinetic energy will cause the ball to travel towards the basket. Also, the force in which he propels the ball has a huge effect on whether or not the ball goes in. Since force equals mass times acceleration, he must accelerate the ball off his fingers well to use the correct force to make the ball enter the basket.

Monday, November 2, 2015

Rocket Report Rubric


I) Materials
3 two liter coca cola bottles -2.99 each
One cardboard box- 1.99
One roll of duct tape- 2.99
Two rolls of toilet paper- 0.99 each
One bag of cotton balls- 1.99
Two pages of printer paper- 0.10 each
A small garbage bag- 2.00
A few yards of string- 1.50

II) Procedure
First, we cut off the bottoms off of two of the bottles and the neck of just one of the bottles. Then, we took the only bottle that was not tampered which we did not tamper, and flipped it upside down, so that the neck was facing downwards. After, we duct taped the bottom untampered bottle to the bottle with no bottom or neck (which looked more like a cylinder). The main portion of our rocket was done. Then, we moved to building the capsule for the egg. To do this, we took the two bottoms of the bottle which we cut off earlier and discovered that they fit snugly inside of each other, so with some tape they could easily support the egg to keep it in place. We gathered the two toilet paper rolls and cut the rolls to fit inside the capsule and taped them to make sure they were secure. We used one of our own eggs to make sure the egg would fit. Once we were sure it did, we surrounded the toilet paper rolls inside the capsule with cotton balls. Lastly, we attached strings from the capsule to a small cutout of a garbage bag for a parachute. The capsule was complete. For finishing touches to the main rocket we cut out carboard and duct taped them to the sides of the rocket as wings. For style, we printed out pictures of famous physicists and taped them around the rocket. And the rocket was complete!


III) Results
Our rocket performed phenomenally. It was the second highest flying rocket in the class and managed to deploy its parachute at an optimal position. Many of the other rockets in our class failed to have their parachute deploy or did not reach 60 feet. In terms of weather, it was quite optimal due to the lack of wind to divert the rocket from its course. In our test launches, I found that when I did not fill up the rocket with a sufficient amount of water, it did not reach a high height. Therefore, our group ensured we filled up the rocket to at least 1/3 of the bottles capacity. We also made sure to be patient when putting the rocket on the launch pad to be sure that no water was wasted. And lastly, Kyle's work in pulling the lever at a good angle to prevent the string from jerking made for a smooth takeoff. As for the parachute, many groups chose to stuff their parachute into their rockets which although it did protect the egg somewhat well, did not allow for deployment. Therefore, we made sure to allow the capsule to fit loosely to the rocket and pack the parachute loosely into the rocket so that the deployment could be safe. We were extremely lucky for the strings of the parachute not to get caught on the capsule though. Finally, our rocket was extremely light compared to the heavy and bulky rockets of our counterparts which may have made a part in our success.

Youtube clip about our process from conception to launch:


IV) Conclusion
Given the success of our rocket, I believe it would be very hard to add too many improvements to the rocket. But I believe that if we strengthened the wings with some stronger cardboard that would have made a significant difference. In terms of the shape and size, I think we reached the optimal composition. But in terms of the weather, if it had a better upwind in order to create a better lift that would have been helpful, but otherwise the project went excellently.